Friday, December 2, 2016

Friday Favorites #95

Happy Friday Foxy Friends! I have today off, woo hoo! Get 13 days off, work 4 get 3 more off, I'm liking this! Going to try and get some shopping done with Baby Fox is in school...now what to get, what to get...it seems that the better deals are online these days. But it's hard to "window" shop when you have no idea what you're shopping for, that's why like wondering around the mall...anyone else? Anyway, onto Friday Favorites...


In case you missed it this week:


Monday: Christmas Traditions
Tuesday: 5 Steps to Picking the Perfect Holiday Card
Wednesday: Fall Favorite Party Dresses
Thursday: Christmas Wreath


So much has happened since I did a last Friday favorites, I don't know where the time goes, it just seems to slip away, and I skipped the last two weeks, oops! Oh well, I'm catching up now, and I'll try not to make it too picture heavy. The most favorite thing we've done lately, taken our very first family vacation! Not a weekend away, but for 6 nights we were in Cabo! The kids did GREAT on the plane!


We pretty much did a LOT of hanging by the pool, lots of eating and lots of good family time. The best part of the whole trip, we're waiting in the customs line and I asked Baby Fox, what was your most favorite part of the trip? I thought he would say, eating ice cream every night, or swimming all day, playing with his friend...nope he said "being with family", melt this mama heart into a million pieces.


Lot's of this happened.


The kids got pineapple juice everyday, which NEVER happens at home, but when on vacation...live a little right?


The first time we took this picture? We asked someone, and they're like all good, so they leave and I go to look at the pictures, and they actually didn't take any pictures, like literally nothing was on the camera...I think people forget how to use real cameras...


Lot's of throwing the kids in the pool.


Looks how tan they got...they were obsessed with one of us trying out the fish eating thing...


So of course some of us caved...I have to say, it really did work.


We have a tradition that we get our Santa pictures the day before Thanksgiving...why you ask? Because the first year we went after Thanksgiving and had to wait for 45 minutes in line with a 1 year old...not fun. Now we make an appointment and go before Thanksgiving, and usually they let us do several sessions of photos if the ones they took don't turn out. No one cried this time, and we got all smiles.


Serious talks with Santa


 Thanksgiving was awesome with family and friends. Lots of yummy food, good conversation and lots of laughs.


I just love this picture of the three of us (my mom and sister).


Kids table...one of the kids is missing due to not feeling well, but by the end of the night she was all smiles and giggles.
 

Food!!!!


Ahh, there's the missing girl, these girls are 7 weeks apart and are super cute together, they're finally at an age when they actually play together.


Same chair, same position 3 years later...

 
I'm know I'm beating a dead horse, but Gilmore Girls...did you watch it? My sister, mom and I watched all 6+ hours in one sitting, it was glorious, no kids, no responsibilities and lots of junk food.


Another show Mr. and I have binged watched the past two weeks...Westworld on HBO, anyone else? Great Sci-Fi if anyone is looking for something like that.


Oh and a bonus, we're doing another Thanksgiving on Saturday. We felt that we didn't get enough Thanksgiving and since we didn't host we had no left overs, so what do we do? Do it again! And just in case you wanted to know, the only whole turkey we could find was 23 pounds...for 5 adults, who's coming?! Happy 2nd Thanksgiving!

Linking up here


Thursday, December 1, 2016

Christmas Wreath

Hello Foxy friends! It's the start of a new season, which means I have another Christmas wreath for you. I went to Hobby Lobby on Black Friday to check out their deals, and I scored all of this stuff for 50% off. Although when does Hobby Lobby not have everything for half off? Anyway, let's get to it.


What You'll Need:

Burlap Wreath (I've been using the same wreath over and over again, but click here for my full tutorial, click here for the video)
Sign to put in middle (I almost always start here, find the sign, buy the "fluff" to match this and this and this would work)
3 Fun Candy Themed Sprigs
3 Ornament Sprigs
1 Roll of Deco Mesh Ribon

Note: In the end I didn't end up using the Merry Christmas burlap ribbon, perhaps for my next wreath.


Directions:

Start with a plain wreath, I took apart this wreath and this is what I had left:


Step 1:

Add in the deco mesh ribbon, if you don't know how to do it, follow this tutorial here that I made.


Step 2:

Add the sprigs of candy, I didn't divide them equally on purpose so there would be a space for the "bow"


Step 3:

Fill in the spaces between the candy with the ornament sprigs.


Step 4:

I felt that the ribbon I was going to use that said Merry Christmas didn't really fit the theme that I had in mind. I had some left over Deco Mesh, so I tried to make a bow, but it's super hard. I was just playing around with it, and realized that it rolled very nicely, so I made a rolled "bow". I think it's fun and matches the theme of the wreath really nicely.


Step 5:

Add the sign, I found one that said Santa Please Stop Here, but really any sign will do. And here is the finished product.


And on my door it looks like this:


There you have it, our Christmas wreath, last year I got the burlap part done and never finished, so literally on our door was a blank burlap wreath, pathetic right?  I bought enough supplies and have an extra burlap wreath laying around, so hopefully this weekend I can make another one...I'm thinking I might put that one over the fireplace...hmmm....where to put it, where to put it.

Linking up here

Wednesday, November 30, 2016

Fall Favorite Party Dresses

Happy Wednesday Friends! Today is the last day The Blended Blog ladies and I are linking up for Favorite Fall Finds. Today I'm sharing this dress, I bought it because it was cheap and I needed to get to free shipping, isn't that how we end up getting so many things, we probably don't need, but I'll be darned if I pay for shipping! Anyway, I was skeptical at first, but you know what, I just love it, I don't have any backless dresses, and this dress is one that just makes you feel like a girl, ya know?


I just love the back of the dress, at first I wasn't sure, but after I had it on for a few minutes, I was feeling more comfortable.


For those wondering I was also wearing this, but this one looks good too...I hear that this one is a cheaper option, and just as good. I want to try it, just haven't gotten around to buying it yet, okay I take that back, I just stopped writing this post and bought it. haha. Now I just need a party to wear this to...I am doing a MNO next week, perhaps I'll wear it there, just because.

I had wanted to do this to my hair for a while, just hadn't found the occasion to do it, it's basically two French braids and then I did a bun at the bottom, I wanted it to be more off centered, more behind my ear, but I guess that will just have to be for next time.


The lipstick is the Kylie Jenner Lip Kit in Spice, I'm seriously obsessed people.


Here are some other options I found, that are fun and flirty for a Holiday party.


Sleeveless Backless Scalloped Dress //  Bell Sleeve Shift Dress //  Red Long Sleeve Shift Dress //Floral Vintage Cocktail Party Dress// Black Peplum Dress // Lace Fit and Flare 


Linking up here

Tuesday, November 29, 2016

5 Steps To Picking the Perfect Holiday Card

Hello Foxy Friends! If you've been around long enough you know my love Christmas cards goes deep, heck I have already scouted out our location for next years pictures! I love planning the outfits, trying to find the best deals for the outfits I have in mind, and then the location, choosing that perfect location, each year I try to pick somewhere we haven't been before. After all that is done, you still have to pick the perfect Christmas Card to showcase that gorgeous picture you took! I've been using Tiny Prints Christmas Cards for a while now and they always have the best choices.

Picking cards shouldn't be the stressful part, so here are my 5 tips to picking out your Tiny Prints Christmas Cards in a no stress, fun way.


Step #1

Go through your pictures and decide which ones are Holiday card worthy. This is Mr. and my favorite part, seeing all of the pictures and deciding which one could be THE ONE. Most times we pick a few out, in case we can't find a card that matches the picture, which we've had happen, so hopefully you got a couple that you can chose from.


Step #2

Go to  Tiny Prints Christmas Cards and decide, based off of narrowing down your pictures, how many photos you want on your card. We are a one picture on the front and a couple of pictures on the back of the kids kind of people. It makes it easier that way to filter the cards based on pictures, theme, occasion, etc., so you're not sifting through hundreds of options when you know you're not going to pick any cards with multiple pictures on it.


Step #3

Find the first card that you like,  click on "personalize"


It will then give you the option to add your photos so you can see what your card might look like if you choose it.


You'll see all of the pictures you added in this bar.


Then you drag and drop your pictures into the card, Tiny Prints even gives you an option to edit the picture right then and there.


Step #4

Open each card that you like into a different tab, Tiny Prints makes it easy that after you enter your information (i.e. names, salutations) so each tab will have the information filled in for you. Now you can flip between tabs with the cards that you like and start to narrow down your final card. Another great thing about Tiny Prints Christmas Cards is that you can change the colors to fit how you want your card to look.
Over the last few years they've added ways to change even the trim on your card, how cool is that? We've done all the different trims over the years, depending on what it's for. It's super easy to flip through the different trims to see which looks best with your card. See how different the card looks just changing the trim?


Step #5

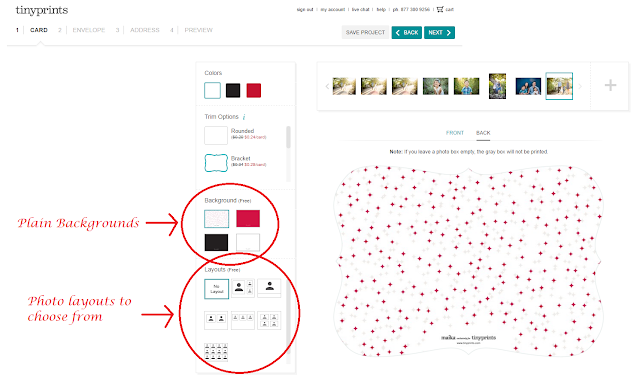
Now you have the front of your card picked out, now you have the option to add something to the back, for free! Heck if you're going to give me the option to add some more pictures to the back for free, I'm going to take it. I will typically try and chose individual pictures of the kids to put on the back along with a salutation. If you pick the white background it will give you more options for layouts.


Confession: I've used the same greeting the past three years...I found one I really liked, and have been using it ever since, "To a joyful present, and a well remembered past. Best Wishes and for Happy Holidays and a wonderful 2017". My sister who remembers every detail of everything, didn't even pick up on the fact that we've used the same one each year, so you're friends and family won't either. Just makes life easier when you already have it figured out. If you don't find the layout that you like, you can always create one in something like Picmonkey or Canva and import that picture in. That's what I did for our card this year. Usually I like to put a picture of their cute little faces, but this picture of them, was just too cute to pass up for the back of the card.


So there you have it 5 easy steps to picking our your Holiday cards, now get to it! I know I love getting Holiday Cards as much as giving them, it's just so fun to see your friends and family's kids growing up, even if you can't see them all the time. And in case you were wondering, if you have ever sent me a card in the last 10 years, I still have it, so if you want to remember what you sent to me 8 years ago...I'm your girl, haha! I know how much cards cost to buy, I just can't throw them away. What do you do with your cards after the season is over?

Linking up here