Showing posts with label Christmas Card. Show all posts

Friday, December 20, 2019

Shutterfly For The Win Again

Thank You Shutterfly for providing me product. As always all opinions and thoughts are my own

Hi Foxy Friends! Today I'm finally sharing our Christmas Cards! Each year, Mr. says that taking family photos is my Super Bowl...and he's pretty much right. After we get our pictures back, Mr. and I both sit down and go over the photos, saving the ones we love in a separate folder. I love that Shutterfly has more options that every this year. This is our 8th year buying from Shutterfly and each year just keeps getting better.

On a lot of cards you can choose Christmas or Holiday sentiment. You can choose the trim, and I feel like they keep giving you more options each year. And you can choose the cardstock.


When you load your pictures, you are able to see it in a variety of cards, so you can really get a sense of what it will look like. I think we had no less than 15 options we were looking at. But in the end we found the perfect card to match the style of picture we had.


When we were taking pictures, when I saw this crosswalk I KNEW I wanted this to be the back of our card. The best part is that the back comes with the card, no extra cost. You better believe we take advantage of that option!


Yes people were looking at us, and no I didn't care. It was 8am on a Sunday morning =)

Shutterfly is almost always having a sale as well, so right now is the best time to buy! If you think it's too late for Holiday cards, buy some Happy New Years cards. They have so many options for that.  Trust me, it's never to late to send cards, people love that you are thinking of them enough to send a card. So just do it, it's not too late, trust me!


Happy shopping for your Holiday or New Year cards!

Tuesday, December 5, 2017

Best Way To Store Your Christmas Cards

Happy Tuesday Foxy Friends! Today is day 10 of  Blogmas, and today we are talking about whatever Christmas-y thing we wanted. I have so many DIY's in the works that I thought I would share a fun DIY project I thought of last year, but didn't get around to doing until this year.

You know all of those Christmas/Holiday/New Years cards you get every year? Well I keep them all, anything anyone sends me I keep. I mentioned that in my Why You Should Buy Holiday Cards Every Year and now I'm going to show you how I am going to keep them from now on. Originally I was going to put them in scrapbooks like this...start with our Christmas card and work from there.


In this book I was able to get 4 years, but those were years that we didn't have as many cards as we receive now. I realized that was going to be a lot of books, of which I store in a cabinet and never bring out. I just love looking at old pictures, so I wanted them to be accessible. So I thought, hey let's put them on a ring, put them in a cute box, display for Christmas Decorations. Done. Super Simple DIY

*Some of the links are affiliate links and I will  either receive a small commission, at no cost to you, if you click on it or if you make a purchase from one of these links, I may also receive a commission on the sale of the product. By purchasing through Foxy's Domestic Side, you're helping me to continue creating fun things for this space.

What You'll Need:

Cute Box To Store Cards In (I found mine at Hobby Lobby last year, and I saw a similar one this year too, this one and this one is personalized, that's pretty cool)

All of your old Christmas Cards

Binder Rings (originally Mr. bought me some cute red ones, pictured, but then I quickly realized those were too small, so I bought 3" ones, which are way too big, so I would go with 2" ones)


Directions:

Step One:

Punch holes into cards. I tried to get them so they all faced the same way, so position the cards accordingly. But ultimately even the ones I did horizontal instead of vertical, still worked out, So really just have at it and get it done quickly. Took me about an hour to get through 5 years worth of cards.


What to do with christmas cards

Now repeat 100 times.

What to do with all of these Holiday Cards


Step Two:

Put cards through the ring.


Storing Christmas Cards


Step Three:

Put all the cards in a box

What to do with Christmas Cards Each Year


I think it is so super cute! I sort of even like the bigger rings, as you can grab them to pull them out of the box. I haven't decided on how I want to designate the year. Right now there is a piece of paper on the back with the year...but a lot of the cards have the year on them, so I think I will be able to figure it out, even without a card designated.


So if you ever want to send me a card, know I'm keeping them all, and if you want to know what card you sent to me in 2011, I have that, 2017, yep have that too.

Take a look at the other Blogmas bloggers and what they are up to today.

The Tastiest Homemade Hot Chocolate
Gift Guide For Beauty Lovers

Don't forget to enter out giveaway for $1500 worth of prizes!


Linking up here

Thursday, November 30, 2017

5 Reasons To Buy Holiday Cards

 Thank You Shutterfly for providing me product. As always all opinions and thoughts are my own.

Hello Foxy Friends! Today I'm sharing one of my favorite things to do each year. Holiday cards. Between me and all of you, Mr. loves sending out cards just as much as I do. Each year he helps me pick them out. Actually this year, while I was cooking dinner, he sat down went through the hundreds of options and picked out his top 5 picks, and then together we decided on the final product. Last year I told you how to pick out your cards, this time I am sharing 5 reasons you need to get yearly holiday cards and why Shutterfly is the best place to get them!  

| ONE |

Memories. Isn't that why we do anything? I keep them all, if you have ever sent me a Christmas card...scratch that, if you have ever sent me any card I still have it. I keep them all by year for random cards, and then the Christmas cards get their own bin. I love seeing how much the kids have grown each year.


Note: I came up with a fun way to store all of these cards I've gotten over the years, besides in the baggies that they are currently in...click here to see how to store your cards.

| TWO |

You know you like getting cards from people and seeing how their kids have grown up. The same can be said about your family. People want to see how much your family has grown. I know I look forward to Christmas cards each year, and when the new year rolls around, I'm sad to have to take down our cards. Full disclosure, one year we kept them up until mid-February.

These are the cards I've gotten over the years.


| THREE |

Feeling connected to friends and family. I know this one seems silly, but everyone is so busy all the time. You mean to see that friend or that friend, but time seems to go faster and faster the older we get. I like getting cards from friends, it lets me know, hey I'm thinking of you and even though we haven't talked in months, I still cherish our friendship. At least that's what I tell myself each time a card arrives in the mail. That and I haven't made it off their Christmas card list yet, and that makes me happy too. So even though you might not talk to them often, know that they always appreciate being thought of and you taking the time to send them a card.

| FOUR |

Shutterfly makes is super easy to pick out your cards. You can choose how many pictures you want, insert pictures, write sentiment click buy and off to your house they come. You say that you don't have time to send them? Shutterfly will do that for you too! Give them your addresses, they put them on the envelopes and send for you, you don't even have to do anything!


Tip: I use the same sentiment every year. Year after year I would scour the internet to try and find the perfect sentiment, and when I found it I decided you know what? I don't remember what someone said last year...they're not going to remember ours, so I use the same one each year.

| FIVE |

Shutterfly always has some sort of sale going on. Heck I have 4 coupon codes at home right now. So if you need one, email me and I'll send it right over! The prices are pretty good for the quality of the card that you are getting. You don't need to spend a lot, Shutterfly has a range of prices, something for everyone. Here are some of my favorite cards this year.

Card #1  


 Card #3 


 Card #4 


You're going to have to wait to see our cards this year until we send them out. Yep I am that person that takes family photos in September/October and then doesn't show anyone anything until after Christmas cards have gone out. Anyone else like that too? Just me? Figures.

So if any of you want to send me a card, know that I'll keep it for forever....then one day in 10 years, you can ask me...hey what did we do for our card in 2017 and BAM I got ya covered.

 Linking up here

Tuesday, November 29, 2016

5 Steps To Picking the Perfect Holiday Card

Hello Foxy Friends! If you've been around long enough you know my love Christmas cards goes deep, heck I have already scouted out our location for next years pictures! I love planning the outfits, trying to find the best deals for the outfits I have in mind, and then the location, choosing that perfect location, each year I try to pick somewhere we haven't been before. After all that is done, you still have to pick the perfect Christmas Card to showcase that gorgeous picture you took! I've been using Tiny Prints Christmas Cards for a while now and they always have the best choices.

Picking cards shouldn't be the stressful part, so here are my 5 tips to picking out your Tiny Prints Christmas Cards in a no stress, fun way.


Step #1

Go through your pictures and decide which ones are Holiday card worthy. This is Mr. and my favorite part, seeing all of the pictures and deciding which one could be THE ONE. Most times we pick a few out, in case we can't find a card that matches the picture, which we've had happen, so hopefully you got a couple that you can chose from.


Step #2

Go to  Tiny Prints Christmas Cards and decide, based off of narrowing down your pictures, how many photos you want on your card. We are a one picture on the front and a couple of pictures on the back of the kids kind of people. It makes it easier that way to filter the cards based on pictures, theme, occasion, etc., so you're not sifting through hundreds of options when you know you're not going to pick any cards with multiple pictures on it.


Step #3

Find the first card that you like,  click on "personalize"


It will then give you the option to add your photos so you can see what your card might look like if you choose it.


You'll see all of the pictures you added in this bar.


Then you drag and drop your pictures into the card, Tiny Prints even gives you an option to edit the picture right then and there.


Step #4

Open each card that you like into a different tab, Tiny Prints makes it easy that after you enter your information (i.e. names, salutations) so each tab will have the information filled in for you. Now you can flip between tabs with the cards that you like and start to narrow down your final card. Another great thing about Tiny Prints Christmas Cards is that you can change the colors to fit how you want your card to look.
Over the last few years they've added ways to change even the trim on your card, how cool is that? We've done all the different trims over the years, depending on what it's for. It's super easy to flip through the different trims to see which looks best with your card. See how different the card looks just changing the trim?


Step #5

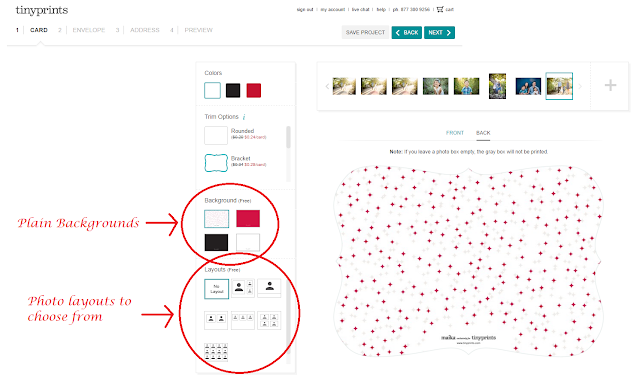
Now you have the front of your card picked out, now you have the option to add something to the back, for free! Heck if you're going to give me the option to add some more pictures to the back for free, I'm going to take it. I will typically try and chose individual pictures of the kids to put on the back along with a salutation. If you pick the white background it will give you more options for layouts.


Confession: I've used the same greeting the past three years...I found one I really liked, and have been using it ever since, "To a joyful present, and a well remembered past. Best Wishes and for Happy Holidays and a wonderful 2017". My sister who remembers every detail of everything, didn't even pick up on the fact that we've used the same one each year, so you're friends and family won't either. Just makes life easier when you already have it figured out. If you don't find the layout that you like, you can always create one in something like Picmonkey or Canva and import that picture in. That's what I did for our card this year. Usually I like to put a picture of their cute little faces, but this picture of them, was just too cute to pass up for the back of the card.


So there you have it 5 easy steps to picking our your Holiday cards, now get to it! I know I love getting Holiday Cards as much as giving them, it's just so fun to see your friends and family's kids growing up, even if you can't see them all the time. And in case you were wondering, if you have ever sent me a card in the last 10 years, I still have it, so if you want to remember what you sent to me 8 years ago...I'm your girl, haha! I know how much cards cost to buy, I just can't throw them away. What do you do with your cards after the season is over?

Linking up here


Thursday, December 5, 2013

Door Christmas Card Holder

Remember when I made this raindeer clothes pin holders and this Christmas tree clothes pinlast year? Well I figured out this year a better way to display all of the beautiful Christmas cards. Last year I ran out of room on our mantel, so hopefully this year I've solved that problem.

This is a "door" to our heater. I decided to decorate the door and wrap it like a present and then display all of the Christmas cards on it. Solves two problems, hides the ugly "door" in the wall for a month, and a great place to display cards. Win-win in my book.


I bought some wrapping paper at Home Goods for $2.99, it happened that the width of the roll was exactly what I needed, what luck! The back of that door has a cork board which makes this project super easy, I stapled the wrapping paper to the top then wrapped it under the door and stapled to the bottom of the cork board.


Next I wrap ribbon vertically down the door, again stapling it to the cork board.


Next it goes horizontal


If you want to make a bow, then follow the directions below. I find that we get so many cards that the bow just gets in the way, but I do like the way it looks way better.
 
To make a bow, decide how wide you want the bow, and then wrap the ribbon around that size a lot. When you think you have enough layers, wrap it 4 more times at least, trust me.
 
P.S. This tutorial part was from a different year, so the paper does not match.


Then cut slits on both sides to form sort of a "V"

My Mom's hands, not mine


Then tie a ribbon or floral wire around the middle like this:


Then you just fan it out, go back and forth, fan one way then fan the next layer the other way, continue to do that, and then when you are done, start to fluff and make it look pretty. It's a little harder to do with a really big bow like I made, but I used the stuff with wire in it, so it was pretty easy to make it do what I wanted.


My bow all done and ready to be put on the wall


But first I decided to really tape down the ribbon that I put up. Initially I just stapled the ribbon to the cork board on the back, but decided that I should really tape it down elsewhere to give it extra strength to hold all those cards!


Then I tied the ribbon down, and used some tape too. Doesn't it look pretty?


Then I added the Christmas tree and Reindeer pins and there you have it, what it would look like with the bow. I had to use Baby and Mini Fox's birth announcements, because we had no yet received any Christmas cards the day after Thanksgiving (when I put this up), but you get the picture.


What it looks like without the bow. In the end with this one, it becomes a wall of cards, because, for us, we get so many that it covers the door.


There you have it a simple DIY Door Card Holder.